
webMOBI Mobile App Administrator Guide

Unit 2 - Starting up with webMOBI app 4
Unit 3 - Mobile Admin Panel 15
Unit 4 - Mobile Email Templates 18
Unit 1 - Basics
Introduction:
webMOBI is a comprehensive event engagement platform designed for crafting in-person, virtual, and hybrid event experiences. This guide has been curated for event organizers aspiring to self-publish their events and access as well as manage the event from the mobile app.
Accessing the webMOBI app or customer branded app:
1. Download the mobile app from app or play store:
Enter email address
You will receive OTP
Enter the passcode you received in the email.
2. Mobile Access:
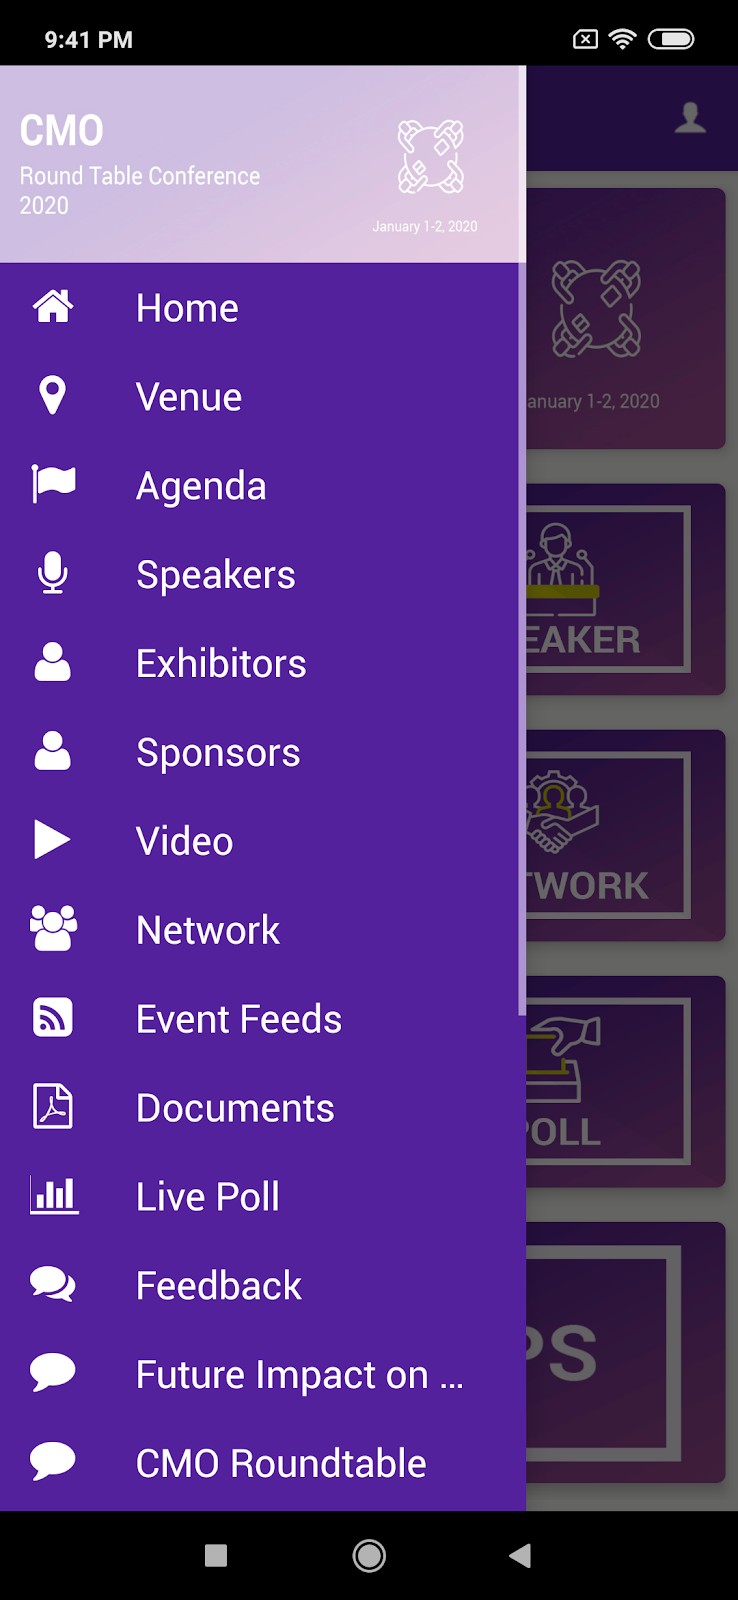
The left navigation represents all the content modules like agenda, speakers etc.
The middle panels represent the most important features that are added as shortcuts
The right panel is networking features and personalized information specific to the event attendee.
If you are an exhibitor or event organizer you will see the Admin panel on the right navigation. This will have all the relevant information including check ins. Mobile surveys and more
Platform Technical Overview:
The webMOBI apps are natively developed using Java for Android and Swift for iOS.
Android: The app supports devices running on Android API level 33 and higher.
iOS: Compatible with devices operating on iOS 11 and above.
To make the most out of the webMOBI platform, ensure that your device meets the specified version requirements. This guide serves as a starting point for a seamless event experience. Dive in, explore, and make your event memorable with webMOBI!
Unit 2 - Starting up with webMOBI app
Start by entering your email address. Shortly after, a code will be sent to this email.
Input the received code into the app, allowing you to successfully log in.
Upon logging in, you'll be presented with the main apps.
Navigate to the Home Screen and locate the Menu Icon situated at the top left corner.
In the dropdown menu, select the different modules like agenda, speakers etc option.
At this point, you can view the entire information for those modules tailored for your event.
Visibility & Updates:
Users will have access to view all active events. Updates from the admin side are ongoing, and users will be able to see these changes once they are live.
Permissions & Configurations:
Event Information for Attendees: Attendees or users who are registered for specific events can view detailed information about those events.
Admin Panel Access: Administrators assigned to specific events will have the privilege to access the admin panel designated for those particular events.
Archived Events: Even though archived events remain accessible on the dashboard, they won't be displayed in the mobile version.
For any queries or further assistance, please refer to the support section or contact our support team.

Left Panel
This section contains generic features :
Interactive Agenda
Speakers, Exhibitors, and Attendees
Documents
Maps and navigation
Videos
Survey
Activity Feeds
Social Media
Twitter Hashtag
Gamification
Sponsor commercial/advertising
Helpdesk
About Us
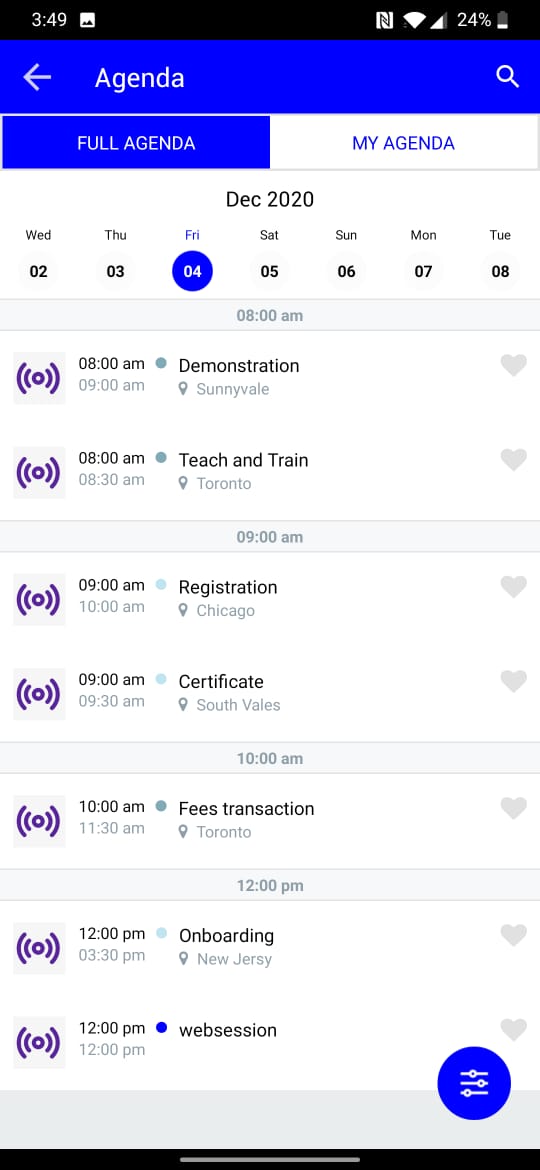
Interactive Agenda:
The attendees will be able to see the entire program of the event, which includes multiple sessions taking place, with corresponding timing, venue details, speakers, presentation details and much more information about each session.
Speakers, Exhibitors, and Attendees
The Speakers, Exhibitors, and Attendees modules contain lists of all the participants who are involved in the event. The users can browse through and know about the speakers, exhibitors, and fellow attendees. This will help to build a network and engage with speakers and exhibitors including handouts and presentation information.
Documents
The event organizer can share important documents, session content, and handouts in PDF format.
Maps and Navigation
The event attendees can provide detailed maps of the site, to help users navigate the exhibitor booths as well as conference rooms. The Google Map enables event navigation as well as searching for the venue.
Videos
The Videos modules allow the attendees to see your event-related videos right on the app
Survey
The survey encourage the audience to participate in a survey and give feedback. The event organizer can gather audience satisfaction data to make your event more successful.
Activity Feed
This activity feature enables the attendees to boost attendees’ engagement where they can engage in live discussions, ask questions, share photos, likes, and comments on other attendees’ posts.
Social Media
The App supports integration with all major social media channels like Facebook, Twitter, LinkedIn, Instagram, and more. The users can browse your social media profiles without leaving your app.
Gamification
Everyone enjoys games, implementing gamification in the event app certainly increases interaction between attendees, presenters, guests. You can define the rules and enable engagement for each event.
Sponsor
The sponsor's logo and name will be visible in the app. The Sponsors can be categorized with different categories.
Helpdesk
The attendees can contact the event organizer via the contact and get to know about the event organizer contact information. The attendees can easily reach out to the event organizer and interact via this module.
About Us
This module is an HTML page that enables you to have any HTML content with a WYSIWYG editor.
Right Panel
This section contains attendee specific modules like:
Admin Panel
My Schedule
My Companies
My Notes
My Chats
Notifications
Inbox
My Contacts
My Meeting
QR Code

Admin Panel:
This feature is available only for admin. The admin can check in the attendees by scanning the QR code. The event organizer can also do on the spot registration from the check-in feature. In the Reports section, Exhibitors will get the list of lead generated
My Schedule:
The users can add any session from the Event Agenda they like to their personalized schedule. It will remind them if they try to have more than one engagement at the same time.
My Meetings:
The Attendees can find a mutually available time and set up a meeting. All the accepted Meetings will be shown in this list.
My Chats:
The Attendees can connect and chat with each other with our Attendee’s Messaging Feature. This list shows all your chats
Notifications:
The Admin can send reminders, updates and survey links to all attendees or specific groups right from the mobile, as well as from the dashboard which will be shown in this feature.
Inbox:
All the Meeting requests will be shown in the Inbox. The Attendee can accept the meeting or decline the meeting depending on his priority.
My Contacts:
Here you can able to perform the Attendee information exchange between two attendees by scanning their respective QR Codes and Chat as well.
My Notes:
An attendee can take notes in any session. Click on Agenda and select a particular session then on Add notes to take notes for that session. All the notes will be displayed in My Notes section
QR code Scanner / Attendees Contact Exchange Process:
This Features can be used by the admin for Attendees check-in and by the exhibitors for collecting leads.
Login into the application.
Tap on the Right Panel of the mobile app and Select the My Contacts.

Tap on Scan QR Code [To fetch Attendee details through QR Code]
Choose any attendee badge to fetch the details.

Scan QR Code to fetch the Attendee Details.

Now, you can find the scanned attendee details in the My Contacts module in mobile apps.
My Companies:
The Companies which you marked as a favorite from both the exhibitors and sponsors will be displayed here.
Unit 3 - Mobile Admin Panel
This section delves deep into the functionalities available to those designated as event design admins. The mobile admin panel caters to both the main admin and exhibitors aiming to scan and gather leads.
Admin Check-In Procedure:
Access: Log in to the mobile app with your admin credentials.
Navigate: Tap the Right Panel in the app, then choose the 'Check In' option.
Methods for Check-In:
Manual: For each attendee, click on 'Check in' to confirm their presence.
QR Code: To use this method, display the attendee's corresponding QR code. Choose the 'Check In via QR code' option to scan and validate.
Admin Survey: After check-in, tap on an attendee's profile. This will lead you to the 'mobile admin survey' section, where the admin can gather specific details about the user.
Exhibitor/Sponsor Check-In Procedure:
Access: Open the app and log in as an Exhibitor or Sponsor.
Navigate: Tap the Right Panel and opt for 'Generate Leads.'
Scan for Leads: Use the app to scan the QR code of an attending delegate. This action will store the lead details.
Review Leads: Click on 'Report' to view a summary of the leads you've generated.
With these features in hand, admins and exhibitors can ensure a streamlined experience and effective data capture during the event.
Moderation by Admins for User-Published Content:
1. Moderation through the Admin Panel:
Launch your event app and tap on the right panel.
Select the Admin panel, then proceed to the 'activity feed' section.
Here, you'll see posts shared by attendees. To moderate, you can:
Select a specific feed and opt to 'report' if you wish to conceal it.
Block an attendee to prevent them from posting further content on the feed.
2. Direct Moderation from the Activity Feed Page:
Access the app's left panel.
Navigate to and select 'feed options' which will redirect you to the activity feeds.
Browse to a particular feed you wish to moderate.
Tap on 'options' for the desired feed, then select 'report' to hide that specific content.
Admins have the responsibility to maintain the integrity of shared content, ensuring a respectful and engaging environment for all attendees.
Controlling Activity Feed from feed page:
Click on the left panel from your mobile app.
Choose feed options to go to activity feeds.
Click on the options from the feed which you want to hide.
Click on the report to hide the feed.
Note:
Only Admins can perform this action.
Once the safe detector detects the content is not safe, the feed will be blocked and added to the reported feeds. The dashboard admin will get notified about the reported post on his mail.
Only the user admin can restore the reported feeds to the timeline.
Unit 4 - Mobile Email Templates
WebMOBI Email Templates Guide
WebMOBI provides a variety of email templates to facilitate smooth communication between event administrators and attendees. Below is a breakdown of these templates:
1. Event Registration Confirmation: Used to notify attendees that they've been registered for the event.
2. New User Registration Notification: Admins receive this template message to inform them when a new attendee registers.
3. Event Waitlist Notification: Sent to attendees to inform them they have been waitlisted for the event.
4. Registration Decline Notification: For attendees who have been informed that their registration was not accepted.
5. New Password Distribution: Assists users by sending them their passwords for easy login.
6. Registration Information: Provides users with their registration and password details.

For every template, you have three functionalities:
- View: Examine the content of the template.
- Edit: Modify the template as per your requirements.
- Convert to Campaign Message: Transform the template into a message suitable for broader campaigns.
To update the user status, whether to activate the 'Waitlist' or 'Declined' notifications, select the appropriate option from the dropdown menu as described below.
